How to Crochet
Single Crochet

Last week, we talked about how to crochet a chain. This week we’re going to build upon that and make a bookmark using the single crochet (sc) stitch. Before I show you how to do it though, let’s find out how you say tomato.
Since learning a new skill isn’t daunting enough, the American names for crochet stitches are different from the British ones. They’re also just close enough in name to make things super confusing. So, if you live in the United Kingdom, please note that I use the AMERICAN definitions. Moving forward, here is a handy-dandy conversion chart for you reference:

Before we start making Single Crochet stitches (sc), you have to create a chain first. Attach your yarn to your hook using a slip knot and chain 6.
You can see in the photos below that one side of the chain is a row of clean Vs and the other has a bunch of nubs. We’re going to work into those nubs, which are also called the “butt” of the chain. (I swear, I didn’t make this up. Your chain actually has a butt. Seriously.) This method will leave a nice edge at the bottom of your work. It also leaves the Vs free to work into later if you want to attach a super sweet edging or whatever. Plus, I think it’s easier overall.

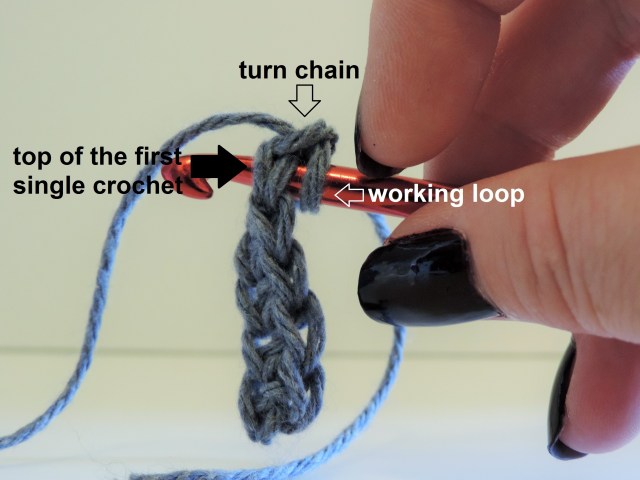
To make your first sc, you’re going to insert your hook in the second chain from the hook, as pictured below. The skipped chain is considered your “turn chain”. You will never work into it. It’s there to keep your row from looking all squished at the end. Think of it as a ladder taking you up to the next level.

Next, yarn over by wrapping the yarn across the throat of the hook and pull the loop through. You should have two loops on your hook.

Yarn over again and pull the yarn through BOTH of the loops on the hook. Congratulations, you just made your first single crochet!

Now, continue down the line, inserting your hook into the butt of the chain, pulling the working strand through to create two loops on the hook, and then pulling the yarn through those two loops to create a single crochet. By the time you get to the end of the row, you should have five single crochets, which will look like this.

To create the second row and every row hereafter, turn your work and chain one. Some patterns will ask you to create your turn chain (the ch 1) before flipping your work, but it doesn’t really matter in this situation. It’s more of a personal preference and, for the most part, will not effect the overall look of your piece.
Alright, so you’ve turned your work over and made one chain. What’s next? See the Vs at the top of your first row? You’re going to insert your hook under the top two strands of that first V. Then, create the single crochet like normal by yarning over and pulling it through the V, which will put two loops on your hook. Yarn over one more time, pull it through those two loops, and you just created the first single crochet on row two.
Continue working across the row, making a single crochet in each V. When you reach the end of the row, you should still have only five single crochet stitches.

If you find that you’re ending up with more than five, you’re probably working into the turn chain by accident. If it keeps happening, try using removable stitch markers to identify the first and last sc in your row.

Congratulations, you now have all of the skill required to make a bookmark, dishcloth, or scarf! You can continue adding rows from here in order to make a simple bookmark. The pattern below is representative of the directions we covered earlier, but in the traditional format:
BOOKMARK
ch 6Row 1: sc in 2nd ch from hook, sc in each ch across, turn – 5 sc
Row 2: ch 1, sc in each sc across, turn – 5 sc
Repeat row 2 thirteen times or until desired length is reached. Finish off and weave in ends.
Last week, we covered how to “finish off” and the same idea applies here. Snip the yarn and pull it through as if you’re making a chain, except you’ll pull the whole length of the yarn through the loop. It will create a small knot.

I’m going to be honest here, I hate weaving in ends. I hate it so much. One day, I hope to be rich enough to have a personal assistant whose only job is to fetch me lattes and weave in my ends. It isn’t difficult by any means, just tedious. There are many ways to do it. Some people use a tapestry needle to thread their loose tails of yarn through the stitches and other people just use their crochet hook. Since I can never find my tapestry needle when I need it, I end up using my crochet hook 90% of the time.

As you’re practicing making bookmarks, remember that learning a new skill takes time. But if you feel as if you need a more hands on experience and don’t know someone who crochets, I recommend going to your nearest independent yarn store. Many local yarn stores offer classes and one-on-one sessions. See you next week for more crochet walkthroughs and free patterns!
~Jac
The first person to bring me a double grande chai latte with no water gets a Misha Collins amigurumi made by me.
Super great instructions w/illustrations too. Great way to show just about everyone that is interested in learning to crochet how to do it. Good job explaining and showing how it is done :)
Thank you!
I love this! Thanks for sharing! I always have trouble making a squareish shape when crocheting because I always crochet into that first ditch by accident. Now I know why it’s not even!
I’m glad I could help! :D
I don’t see any photos for some reason… :(
oh jeez….the moment I comment, the photos come up, lol…
Pingback: Pattern Release: Rainbow Rags – Lattes & Llamas